
2. It's healthier.
You control exactly what goes into your food and you know where it comes from. This helps you avoid the consumption of any additives, preservatives, and pesticides. 3. It tastes better. Store-bought fruits and vegetables just can’t compare to food harvested at the peak of its flavor and preserved by you. Your family will notice the difference in flavor, texture, and even color. Home-canned food takes the prize every time!Methods to AVOID
Before we discuss the proper procedures, let me take a minute to address the methods to avoid in food preservation. When canning foods, we need to make sure the food and process is safe to share with our families in later months. The United States Department of Agriculture (USDA) has tested and approved recipes for our safety. Therefore, recipes should be used as written and not altered by adding more or less of certain ingredients, as it changes the pH values and thus the times in canning. Please do not use the following techniques, as they are not tested as being safe:-
The open kettle method
- Food is cooked in an open pan and poured into jars. The lids are placed on top and the heat from the food causes the jar to seal. It is difficult for foods to reach temperatures that will destroy microorganisms. This is also under-processed and as the food spoils, the jars become unsealed. All of your hard work is thrown away.
-
Steam canning
- Jars are placed in a covered pan with hot water to circulate around the jars. It does not maintain a steady flow of steam or temperature and it is impossible to know if the heat has penetrated the food properly.
-
Oven, microwave oven, or dishwasher canning
- These canning methods are also not appropriate for the reasons mentioned above and the additional risk of jars breaking. Using the dishwasher to preserve foods is not acceptable either, because of the uneven temperatures.
Correct Canning
Use the proper equipment. When canning, use either a properly calibrated or boiling water (or water bath) canner. You should have the dial gauge calibration of your pressure canner checked each year, but if you use a weighted gauge, you do not need to have it tested. Gather jars made for food preservation, not old mayonnaise jars or other commercial “one-use” jars. Avoid old jars that do not use the vacuum seal and ring tops. As you gather your garden produce after the dew has dried, plan your day so that you may harvest and preserve quickly to save as many nutrients as possible. Select young, tender, and unbruised items for best results. Make sure that before you begin canning the recipe has been tested by the USDA, that you have enough jars, lids, rings, and labels or a pen for marking the date for rotation purposes. Ideally, home-canned products should be used the following year, but can be kept for up to three years, realizing that the nutritional quality decreases with time.Which canner should I use?
How do I know if I’m to use a pressure canner or a boiling water canner? It depends on the acidity of the food you are preserving. Acidic foods can be done in a boiling water canner. Some examples of high-acid foods are tomatoes (add lemon juice or ascorbic acid to all varieties, since many have become low-acid), most fruits, berries, juices, jellies, butters, and jams. Many pickled foods are also preserved in the boiling water canner, such as pickles, sauerkraut, relishes, and recipes that pickle other vegetables like beets or peppers. Again, let me remind you to use a tested recipe and not to substitute or alter the ingredients, to ensure a safe food product for your family. Boiling Water Process A boiling water pressure canner is relatively simple to operate by using either a raw pack or a hot pack. A raw pack is where you place cold or raw items in the canning jar; hot pack is where you heat the items prior to placing them in the jar. Remember to leave “head space” for the food to have room to expand – no food or water should be in the neck of the jar. Both procedures use hot water or juice poured over the items before they are placed in a boiling water canner on the range top. Top with hot lids, screw bands on tightly, and immerse in hot water in the canner. Water should cover the jars by 1-2 inches. Continue with processing times, counting the minutes from the time the water comes to a boil. If you live in an area at a higher altitude, increase the processing time for a boiling water canner. When processing is completed, remove the jars with a jar lifter and put them in a dry place to allow them to cool for 12-24 hours before labeling and storing them.
Pressure Canner Process
A boiling water pressure canner is relatively simple to operate by using either a raw pack or a hot pack. A raw pack is where you place cold or raw items in the canning jar; hot pack is where you heat the items prior to placing them in the jar. Remember to leave “head space” for the food to have room to expand – no food or water should be in the neck of the jar. Both procedures use hot water or juice poured over the items before they are placed in a boiling water canner on the range top. Top with hot lids, screw bands on tightly, and immerse in hot water in the canner. Water should cover the jars by 1-2 inches. Continue with processing times, counting the minutes from the time the water comes to a boil. If you live in an area at a higher altitude, increase the processing time for a boiling water canner. When processing is completed, remove the jars with a jar lifter and put them in a dry place to allow them to cool for 12-24 hours before labeling and storing them.
Pressure Canner Process
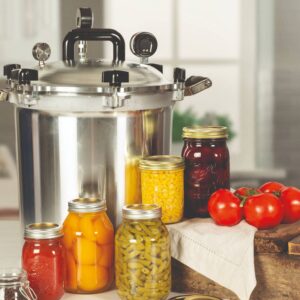 Using a pressure canner, either with a weighted gauge (never needs to be tested) or a dial gauge (needs to be tested yearly) gives us the security of processing to an internal temperature of 240 degrees at ten pounds of pressure, which kills any microorganisms that could spoil the food or make us sick. Pour two or three inches of water in the bottom, add hot jars with lids attached, and lock canner lid in place. It is essential to follow this next step and vent the canner. Allow steam to escape from the canner in a steady flow for 10-15 minutes before you put the weight on or close the petcock. This allows the steam to drive the air out of the canner so you can achieve the higher temperatures. Set the timer after the canner has reached the desired pressure on the gauge or weighted gauge begins to rock gently. Keep in mind that the standard directions for most canners and canning recipes are for altitudes below 1,000 feet above sea level. If you live in an area at a higher altitude, increase the processing time for the pressure to build up in a steam-pressure canner. Check with your local Extension office for precise directions. After processing time is complete, allow canner to cool naturally, remove the lid and allow jars to sit for 10-15 minutes before moving them to a dry place to cool for 12-24 hours before checking the seal.
 Working in the garden and preserving food are some of my fondest memories of home with my mother and grandmother. They provided guidance and help to teach me how to correctly follow the most up-to-date directions. Remember that food changes, and we need to make sure that what we are doing is the best for our families. Please check your recipes and follow correct processing times to make sure your family has safe food for fall and winter gatherings.
I realize this is a lot of information for some of you, and for others it provides a few good reminders to provide safe food for your family. If you have particular questions, please contact your local Extension office or search for fact sheets at the Ohio State University Extension web site at: http://ohioline.osu.edu.
Shop ALL Canning Supplies and Equipment from Lehman's >>
Ohio State University Extension embraces human diversity and is committed to ensuring that all educational programs conducted by Ohio State University Extension are available to clientele on a nondiscriminatory basis without regard to race, color, age, gender identity or expression, disability, religion, sexual orientation, national origin, or veteran status.
By by Melinda Hill
Extension Educator, OSU Extension, Wayne County
Family and Consumer Sciences
Originally published in June 2005.
Working in the garden and preserving food are some of my fondest memories of home with my mother and grandmother. They provided guidance and help to teach me how to correctly follow the most up-to-date directions. Remember that food changes, and we need to make sure that what we are doing is the best for our families. Please check your recipes and follow correct processing times to make sure your family has safe food for fall and winter gatherings.
I realize this is a lot of information for some of you, and for others it provides a few good reminders to provide safe food for your family. If you have particular questions, please contact your local Extension office or search for fact sheets at the Ohio State University Extension web site at: http://ohioline.osu.edu.
Shop ALL Canning Supplies and Equipment from Lehman's >>
Ohio State University Extension embraces human diversity and is committed to ensuring that all educational programs conducted by Ohio State University Extension are available to clientele on a nondiscriminatory basis without regard to race, color, age, gender identity or expression, disability, religion, sexual orientation, national origin, or veteran status.
By by Melinda Hill
Extension Educator, OSU Extension, Wayne County
Family and Consumer Sciences
Originally published in June 2005.


0 Comments