
Instant insulation for $20!
When I was little and my grandfather was building our home "up in the sticks" of rural Massachusetts, we lived in three rooms plus an enclosed porch while the second phase was being added onto the back. It would become another two bedrooms and a bathroom, but for one winter I recall, it was enclosed but not insulated or finished, so an army surplus blanket hung in the roughed-in doorway at one back corner of the kitchen. Even in the finished part of the house though, my grandmother noticed that sitting next to a window, though it were near a heat source, felt cold even though the salvaged windows had been installed tightly and well caulked. The back of my house faces northwest, but there is a tree line about 75' back from the house, so wind directly from that direction is less of an issue that it is on the adjacent northeast side. Here in the stormy mid-Atlantic coastal region, as was the case where I grew up, storms called Nor'easters are some of the most formidable things you can imagine where potential for losing heat during the winter is concerned; and there is a span of a half mile or more that is open pasture on that side of the house. The near-constant wind from that direction was my deciding factor on where to start. (As a side note, I'm hoping that eventually, that selfsame wind will power part of a hybrid system I have in mind, that provides me with backup power; but for the time being, saving interior heat is my focus.)Now, granted, this was the early 1950s and the closest thing anyone had to double-pane glass was a regular single-pane window with a storm window fitted on the outside during winter. Fast forward to the high-quality low-E windows I paid dearly for in my new home, and I still noticed last year during our first winter here, that there was a noticeable difference in temperature when I held my hand close to the glass. After having had the walls framed with 2 x 6s and insulated with R-19, I was not about to take losing heat through the windows lightly. I recalled that my grandmother had solved the worst of the problems in that little cottage with old blankets and quilts, safety-pinning them at first, and then later folding over the tops and sewing them, so they'd hang from a curtain rod, and then rolling them up and tying them during the day to let in the light. Just for the heck of it, I did a search online using the words "window quilt" and investigated the first vendor who sold custom-width window quilts (did you know they actually come with draw cords and valences?). It looked like the very thing, updated with some nice details, so I plugged in the width of a number of my windows - 39" and the length, 60" and chose their basic fabric, etc. When an "on-sale" price of more than $300 came up for one window, I decided (once my heart started beating again) to do what I always do when I want something I either can't afford or aren't willing to part with the cash for: make it myself. Now, if you have experience sewing and/or quilting, you're ahead of the game - I'm going from square one here for those who are new to it, or who might even have to find a way to fudge some of the steps. We begin with differentiating between inside mount and outside mount curtain rods. The most effective for heat retention is an inside-mounted rod; that is, a spring-tension rod that is adjusted so it pushes against the opposing inside frames around the window, and the quilt hangs right close to the glass rather than out a few inches and down over the windowsill the way typical draperies are hung.. The reason for this is simple physics: heat rises, cold air sinks, and if you have a surface-mounted curtain standing out a few inches from the wall, the air that is chilled by its proximity to the glass will sink right down behind the curtain, over the sill and into your room. The fact that it's curved back into the wall and hugs the sides may make it look snug, but put your hand a couple inches below the hem and you'll see what I mean. Now, let's use my window as an example for measurements: 39" wide by 60" long. I want my window quilt to be as close to this as I can get it or even a little larger so it actually gets "tucked in" a bit. I'll aim for a finished size of 39" wide by the 60" length plus an extra 4" to fold over at the top for a curtain rod channel. I confess here to having been sorely tempted to go to the local fabric store and find quilting fabrics in homey plaids and stripes to match the color scheme I like and making something like the local Amish women warm their families' beds with. But I still work full-time and I wanted this done this winter, (don't laugh - I have a four year old Valentine's table runner going that still won't be done this coming February) so I decided to practice what I preach and set myself a budget of $20 for the whole project. In spite of having no time for piecing a quilt block, I do like the idea of some kind of seasonal pattern, and I pictured snowflakes on a dark background. A visit to the local craft store yielded just the thing - a nylon, seasonal outdoor banner with a pattern very close to what I had in mind. I compared its price at $7.99 to the same product at the local, national chain hardware store, and it was a bargain by four dollars, so the craft store got my money. The flag only measures 28" by 48" however, so I'd have to come up with fabric to sew along both sides as well as top and bottom. It's a shame it didn't match the length exactly, as having a channel already sewn into the top for the flagpole would've saved me a lot of time; but it's a lively thing with glittery edges on large white flakes that I'm pleased with. A search of the attic (where most of my sewing supplies are still packed) rendered nothing I could use for the edging, although I did have an old sheet with a tear that would suffice for the backing. Armed with the $12.01 I had left of my twenty, I scoured the fabric store until I found a flannel plaid I liked in blue, red and gray, as well as a small package of thin, unwoven synthetic batting. A package of wide, red cotton seam binding would make nice ties and I left the fabric store smiling smugly to myself, admiring my receipt for $11.51 - I had brought my project in $.50 under budget. I had also stuck my car key into the door of a beige Dodge Intrepid that was not mine, and was about to turn it when I noticed a baby seat in the back. Who the heck would put a baby seat in my car?! Just then I spotted a diaper bag and some other paraphernalia on the front passenger side seat, and I yanked my key out of the door, praying that the car I had nearly burglarized didn't have an alarm! Turning to look around, I found my own car sitting directly behind me, in the next row back, and I made my escape quickly, praying nobody had seen me. Moral of the story - save smug victories for after you get home. Meanwhile, I had a window quilt to make, and while I didn't complete it in the single weekend I wished, it's doing better than the Valentine's Day table runner. To start, I cut strips to go across both top and bottom that would make up the length plus the 4" to fold over for the channel; and then did shorter, narrower strips to make up with width. There wasn't space to set up my sewing machine for this part, and the seam along the sides of the banner was pretty thick, so I tried some fabric glue. I used a brand called Tear Mender, but I'm sure any washable fabric glue would work. After that came cutting and fitting the batting to the back of the banner and fabric "quilt top." I pinned it so the edges of the fabric overlapped the batting a little (see photo 1) and then ran a line of stitching along it. The batting I had purchased was a bit shorter than the full length of the window, so I left the "unbatted" part (is there such a word?) for the top so the full insulation would come down to the bottom of the window.
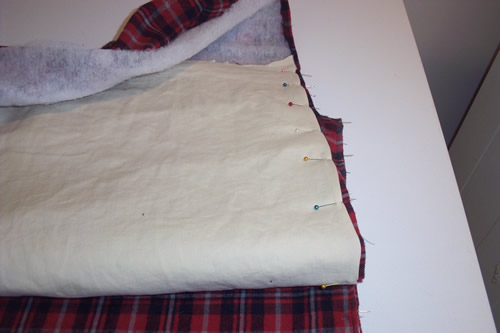 Next, the sheet was pressed flat and fitted to the back of the quilt in such a way that a narrow bit of the finished fabric showed along the edge and again, pinned and stitched. I was working on the top of my chest freezer for this, as it's wide and smooth enough to maneuver the fabric around. Never mind the dust bunnies the quilt kept picking up when the long part drifted down between the freezer and the wall (see photo 2).
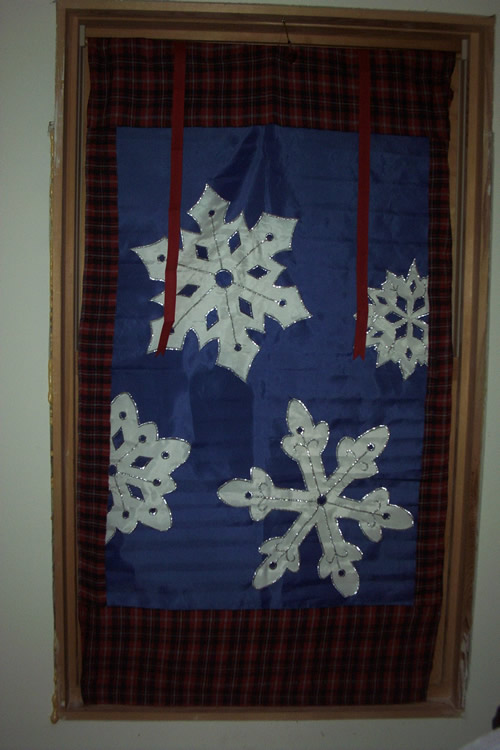 Last, a hem can either be done with artful, hidden stitches, or a neat line of machine stitching along the bottom and top; and then a channel for the curtain rod made by lapping the top over and stitching it like a conventional curtain panel. Let down for the night, our snowflake quilt goes with nothing in the room, but is still a far cry from the pastel baby quilts that stood in contrast to the wood axe by the back door in my grandparents' place (see photo 3).
Rolled up and tied, it will let in sunlight or moonlight, as outdoor temperatures dictate (see photo 4).
Last, a hem can either be done with artful, hidden stitches, or a neat line of machine stitching along the bottom and top; and then a channel for the curtain rod made by lapping the top over and stitching it like a conventional curtain panel. Let down for the night, our snowflake quilt goes with nothing in the room, but is still a far cry from the pastel baby quilts that stood in contrast to the wood axe by the back door in my grandparents' place (see photo 3).
Rolled up and tied, it will let in sunlight or moonlight, as outdoor temperatures dictate (see photo 4).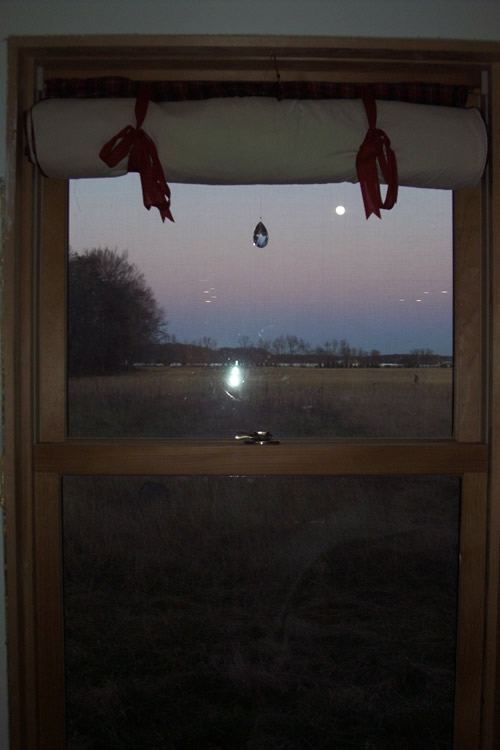 If you're in such a cold area that you hate even uncovering the windows completely during daylight hours, consider mounting a second spring-tension rod with a short "valance" length quilt on the lowest quarter of the window. This will allow you to look out and receive any sunlight that may come in during the day without allowing cooler air to slide down into the room. At night, the top quilt gets unrolled and tucked behind the lower one. I particularly like this idea for the window over my kitchen sink, where the views of deer, birds and the woods behind the house are too precious to give up entirely during the coldest months.
Last but hardly least, I'm sure it's clear that if either your access to a fabric store or the funds to make this project are a problem, look for things you can substitute, even if only temporarily. The satisfaction of cutting heat loss, blocking drafts and noticing a difference in your heating bill can go a long way toward excusing a bedroom window graced by a beach towel!
Look at your doors as well, and consider mounting a rod over the top inside any that do not have a storm door or vestibule. A "quilt" like this will come down to the floor and serve the same purpose as doorway draperies have in the British Isles for ages.
If you're in such a cold area that you hate even uncovering the windows completely during daylight hours, consider mounting a second spring-tension rod with a short "valance" length quilt on the lowest quarter of the window. This will allow you to look out and receive any sunlight that may come in during the day without allowing cooler air to slide down into the room. At night, the top quilt gets unrolled and tucked behind the lower one. I particularly like this idea for the window over my kitchen sink, where the views of deer, birds and the woods behind the house are too precious to give up entirely during the coldest months.
Last but hardly least, I'm sure it's clear that if either your access to a fabric store or the funds to make this project are a problem, look for things you can substitute, even if only temporarily. The satisfaction of cutting heat loss, blocking drafts and noticing a difference in your heating bill can go a long way toward excusing a bedroom window graced by a beach towel!
Look at your doors as well, and consider mounting a rod over the top inside any that do not have a storm door or vestibule. A "quilt" like this will come down to the floor and serve the same purpose as doorway draperies have in the British Isles for ages.


0 Comments